Your Mac can read text aloud for free, with no app to install. Open Apple menu › System Settings › Accessibility › Read & Speak, turn on Speak selection, then select text in any app and press Option-Esc. Press it again to stop. On macOS 15 and earlier, the same switch is under Spoken Content. For long articles, Accessibility Reader opens the text in a clean full-screen view with a Play button, and the say command in Terminal turns any text into an audio file. Below: every built-in option, the settings worth changing, and fixes.
Every way your Mac can read aloud, at a glance
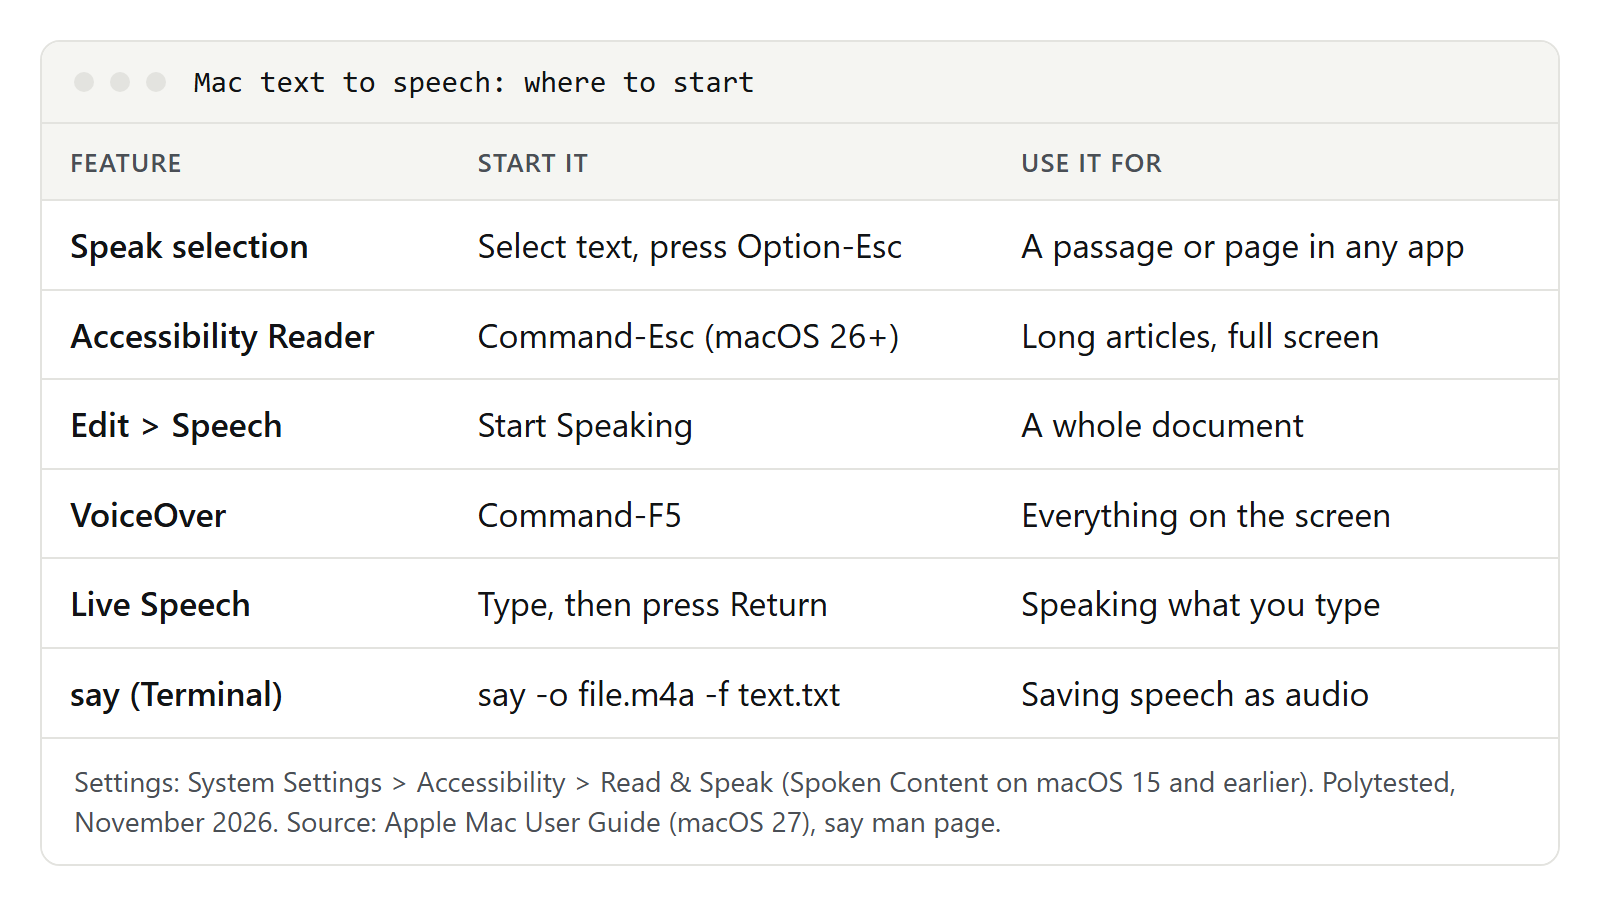
macOS has several speech features, each built for a different job. Each one has its own section below.
| Feature | How you start it | Best for |
|---|---|---|
| Speak selection | Select text, press Option-Esc | A paragraph or a whole page in any app |
| Edit › Speech › Start Speaking | Menu bar in many apps | A whole document, without a shortcut |
| Accessibility Reader | Command-Esc (macOS 26 and later) | Long articles in a clean, full-screen view |
| VoiceOver | Command-F5 | Hearing everything on the screen, including buttons and menus |
| Live Speech | Type in the Live Speech window, press Return | Speaking what you type, in person or on calls |
| Personal Voice | Recorded once in Accessibility settings | A synthesized voice that sounds like you |
| say in Terminal | say "text" or say -o file.m4a | Saving speech as an audio file |
For the opposite direction, speaking while your Mac types, see our guide to dictation on Mac. For Windows, phones and browsers, see how to have text read aloud for free.
Speak selection: the fastest way to hear text
Speak selection is what most people mean by "text to speech on Mac." It works in almost every app, from Mail and Notes to PDFs and websites.
- Choose Apple menu › System Settings, then click Accessibility in the sidebar. You may need to scroll down.
- Click Read & Speak.
- Turn on Speak selection.
- Select the text you want to hear and press Option-Esc.
- Press Option-Esc again to stop.
If you don't select anything, your Mac speaks the text it finds in the current window. Apple's example for older versions: in Mail, the open message is read. If there is no text to read at all, you hear a short alert sound instead.
In many apps you can also use the menu bar: Edit › Speech › Start Speaking, and later Edit › Speech › Stop Speaking.
Where the setting is on your macOS version
Apple renamed the section in macOS 26 (Tahoe). The switch and the shortcut stayed the same.
| macOS version | Path |
|---|---|
| macOS 26 Tahoe and macOS 27 | System Settings › Accessibility › Read & Speak |
| macOS 13 Ventura to macOS 15 Sequoia | System Settings › Accessibility › Spoken Content |
| macOS 12 Monterey | System Preferences › Accessibility › Spoken Content |
To check your version, choose Apple menu › About This Mac.
The controller and highlighting
Click the Info button (the small "i") next to Speak selection to change how it behaves:
- Keyboard shortcut: press the keys you want instead of Option-Esc. Apple's example is Option-Tab.
- Highlight content: words, sentences, both, or none.
- Word color and Sentence color: the highlight colors.
- Sentence style: an underline or a background color for the current sentence.
- Show controller: Automatically, Never or Always.
The controller is a small panel that appears while your Mac speaks. It lets you change the speaking rate, jump one sentence back or forward, pause, resume and stop. For anything longer than a paragraph, set it to Automatically or Always.
You can also give Speak selection its own on/off shortcut: System Settings › Keyboard › Keyboard Shortcuts › Accessibility, then Turn speak selection on or off.
Choose a better voice and download more
The voice your Mac uses is the System voice, and more voices are a free download from Apple.
- Open System Settings › Accessibility › Read & Speak.
- Click the System voice pop-up menu and choose a voice, or click the Info button next to it to see more.
- On the left, select a language. On the right, click a voice name to add it. If a download icon appears next to the voice, it downloads from Apple, so you need an internet connection.
- Click the play icon next to a voice to hear a sample before you download it.
- Click Done, then pick the new voice in the System voice menu.
A downloaded voice can't be used until its download is finished, so give it time before you assume something went wrong.
A language can have voices for several countries or regions, and Apple notes that you may need to scroll down to see them all.
To remove a voice you no longer use, click the Info button next to System voice, click the voice, swipe left on it with two fingers on your trackpad, then click Delete.
Speaking rate and volume
In the same Info panel next to System voice, sliders adjust how fast and how loud the voice speaks, with a sample button to hear the result. The Speak selection controller also changes the rate while your Mac reads.
Teach your Mac to pronounce names
Names often come out wrong. Turn on Pronunciations in Read & Speak and click the Info button to add a word. Apple lets you dictate or spell out how the word should sound.
Other languages
Two settings control language:
- System speech language: the language your Mac uses to speak text and alerts, if it should differ from the language of your Mac.
- Detect languages: when it's on, your Mac switches languages automatically if a text mixes several. When it's off, everything is read in the system speech language.
Apple notes that voices aren't available in every language. If you often listen to French, our guide to French text to speech covers what to listen for.
Accessibility Reader: a full-screen view for long text
Accessibility Reader arrived with macOS 26 Tahoe. It shows the text of the current app in a full-screen view and reads it aloud with simple playback controls, in any app.
- In System Settings › Accessibility › Read & Speak, turn on Accessibility Reader.
- Optional: click the Info button and turn on Autoplay so reading starts by itself.
- In any app, scroll to the part you want to read and press Command-Esc. You can also choose Edit › Speech › Open in Accessibility Reader, or use Accessibility Shortcuts.
- Click the play button to listen. You can pause, skip backward or forward, change the speed and drag the slider to jump to a point.
You can also change the theme, colors, font, size and spacing, and the style of the playback highlight. If the Reader finds no text, it tells you.
On macOS 27, Accessibility Reader can also use Apple Intelligence to clean up the formatting, summarize text and translate it into one of your preferred languages. Apple notes that Apple Intelligence isn't available in all languages or regions and that usage limits may apply.
More Read & Speak options: pointer, typing and alerts
Three more switches in Read & Speak make your Mac speak in other situations:
- Speak item under the pointer: your Mac names what's under the pointer. You choose whether it does this all the time or only when you use Zoom, how much detail it gives (High, Medium or Low) and how long it waits before speaking.
- Speak typing feedback: your Mac speaks what you type. Options: Echo characters, Echo words, Echo selection changes (the character next to the insertion point when you use the arrow keys) and Echo modifier keys, including Caps Lock.
- Speak announcements: your Mac reads dialogs and alerts aloud. You pick the voice, a phrase it says first (such as the app's name or "Attention!") and a delay. Play Sample previews it.
VoiceOver: when you want the whole screen read
VoiceOver is the Mac's built-in screen reader. It describes buttons, menus and windows as well as text, and lets you control the Mac with the keyboard or trackpad. For casual listening, Speak selection or Accessibility Reader is simpler.
- Turn it on or off: press Command-F5. On a Mac or Magic Keyboard with Touch ID, hold the Command key and quickly press Touch ID three times. You can also ask Siri or use System Settings › Accessibility › VoiceOver.
- The VO key: VoiceOver commands start with the VoiceOver modifier, Control-Option together or Caps Lock.
- Pause speech: press Control; press it again to resume.
- Practice: VO-Fn-Command-F8 starts the interactive tutorial, and VO-Fn-F8 opens VoiceOver Utility, where you change its voice, rate and pitch.
The reading commands from Apple's VoiceOver guide:
| To read | Press |
|---|---|
| Everything from the current position ("Read All") | VO-A |
| The current paragraph | VO-P |
| The current line | VO-L |
| The current sentence | VO-S |
| The current word (press again to spell it) | VO-W |
| The current character | VO-C |
If your Mac started talking and you don't know why, VoiceOver is the usual cause, and Command-F5 turns it off. Our guide to turning off text to speech covers every switch.
Read aloud in Safari, Mail, Books, PDFs and Word
- Safari: for articles, first click the Page menu in the Smart Search field and choose Show Reader, which removes menus and ads. The option appears only when Safari recognizes an article. Then select the text and press Option-Esc, or open Accessibility Reader with Command-Esc.
- Mail and Notes: open the message or note and press Option-Esc without selecting anything, or select a passage first.
- Books: for books that include the Read Aloud feature, click the play button in the book's toolbar and choose how pages turn. For any other book, go to the page and choose Edit › Speech › Start Speaking.
- TextEdit: Edit › Speech › Start Speaking reads the whole document, or only the selected part.
- PDFs in Preview: select the text and press Option-Esc. If you can't select any text, the PDF is probably a scanned image, and your Mac has no text to read. Recognize the text first with an app that offers OCR, or copy it from the original file.
- Pages, Keynote and other apps: Speak selection works in most apps where you can select text.
Microsoft Word for Mac: Read Aloud
Word has its own reader, separate from macOS. Microsoft says it's available in Office 2019, Office 2021 and Microsoft 365.
- On the Review tab, select Read Aloud.
- Use the controls to play, pause, jump to the previous or next paragraph, and stop.
- Select the gear icon to change the Reading speed and, under Voice Selection, the voice.
Keyboard shortcuts on a Mac: Control-Option-Space starts Read Aloud, Option-Space plays or pauses, and Option-Up Arrow or Option-Down Arrow jumps to the previous or next paragraph. Read Aloud uses the document's proofing language, so a wrongly set language gives you the wrong voice. Microsoft's more natural neural voices need an internet connection and a signed-in Microsoft 365 account.
Save speech as an audio file with the say command
The say command has been part of macOS since the Mac OS X years, which is why "Mac OS X TTS" still points to it. It speaks text from Terminal and saves it as an audio file you can play on a phone or add to a video. Open Terminal (in Applications › Utilities) and try these. Everything below comes from the say manual page; type man say in Terminal to read it on your Mac.
Speak a sentence:
say "Your meeting starts in five minutes."List the voices installed on your Mac:
say -v '?'Use a specific voice. Replace the name with one from your list; names with spaces need quotes:
say -v "Voice Name" "This sentence uses another voice."Change the speed. The rate is in words per minute:
say -r 160 "A little slower than usual."Read a whole text file instead of typing the text:
say -f ~/Desktop/notes.txtSave the speech as a file
AIFF is the default format. For a smaller file that plays almost anywhere, use the .m4a ending; the file format follows from the ending:
say -o ~/Desktop/notes.aiff -f ~/Desktop/notes.txt
say -o ~/Desktop/notes.m4a --data-format=aac -f ~/Desktop/notes.txt
A few more options from the manual:
--file-format=?lists the formats your Mac can write (AIFF, caff, m4af and WAVE are documented).--progressshows a progress meter while a long file is created.-iprints the text as it is spoken, highlighting each word.[[slnc 200]]inside the text inserts a short pause, as in the manual's own example.
One detail trips people up: if you type text into say line by line in Terminal and save to a file, the file contains only the last line. Use -f with a text file, or put the whole text in quotes.
If you plan to publish audio made with Apple's voices, check Apple's macOS software license agreement first; this guide isn't legal advice.
Shortcuts: audio files without Terminal
If you prefer clicking to typing, the Shortcuts app has a Speak Text action that reads text aloud and a Make Spoken Audio from Text action that creates an audio file, with settings for voice, language, rate and pitch. Add a Save File action after it to keep the result, for example on your Desktop. Search for "speak" in the actions list to find them.
Live Speech: type, and your Mac speaks for you
Live Speech is for people who can't speak or prefer not to: you type, and your Mac says it out loud, in a room or during FaceTime and phone calls. Apple lists a Mac with Apple silicon and macOS Sonoma or later as requirements.
- Open System Settings › Accessibility, then Live Speech. In macOS 27 it sits under the Speech heading.
- Turn on Live Speech.
- Click the Type to Speak field in the Live Speech window, type, then press Return or click the speak button.
Live Speech uses the system voice unless you pick another in the Voice menu, including a Personal Voice. You can save phrases you use often and group them in categories such as work or school. The Live Speech icon in the menu bar shows or hides the window. Apple notes that Live Speech isn't available in every language.
Personal Voice: a voice that sounds like you
Personal Voice is Apple's feature for people at risk of losing their ability to speak. You read a series of sentences aloud, and your Mac creates a synthesized voice that sounds like you. Apple's rules and requirements:
- Mac: a Mac with Apple silicon, with a login password set.
- Languages: English (U.S.), Mandarin Chinese (China mainland) and Spanish (Mexico), according to Apple's Mac guide.
- Where it works: Live Speech, Read & Speak and VoiceOver, plus third-party apps you allow, such as augmentative and alternative communication (AAC) apps. Apple says those apps can speak with your voice but can't capture speech from it.
- Use: only your own voice, for your own personal, noncommercial use.
To create one:
- Open System Settings › Accessibility and click Personal Voice (under Speech in macOS 27).
- Click Create a Personal Voice and enter your login password.
- Follow the instructions on screen and read the sentences aloud with the built-in microphone or a headset. You can stop and save at any time, then come back and click Continue Recording.
- Your Mac processes the recording on the device and notifies you when the voice is ready.
Turn on Share across devices to use the voice on your other Apple devices with the same Apple Account; Apple says this needs two-factor authentication and that iCloud stores the voice with end-to-end encryption. A deleted Personal Voice can't be recovered. A quiet room and your normal speaking style give the voice the best material to work with.
When an AI voice tool is the better choice
The built-in voices are free and built in, which is enough for listening to your own reading. An AI voice service may suit you better when:
- You publish the audio: for a YouTube voiceover, a podcast intro or a course, you usually want a more expressive voice and clear commercial terms. Personal Voice is for personal, noncommercial use only.
- You need a consistent voice in several languages: some services keep one voice across many languages, which helps with translated videos.
- You want more control than rate and pitch: ElevenLabs, for example, documents voice cloning, voices designed from a text description and emotion steered by cues in the text.
- You listen on many devices: some reader apps sync your documents and reading position between phone and computer.
Our list of free AI voice generators explains what each free plan allows, including ElevenLabs. If you mainly want a reading app that works everywhere, see our Speechify alternatives.
Mac text to speech not working? Fixes by problem
You hear nothing
- Check that Speak selection is on in Read & Speak (Spoken Content on macOS 15 and earlier).
- Check the volume: System Settings › Sound › Output. Drag Output volume to the right, make sure Mute isn't selected, and check which output device is chosen.
- If you hear a short alert sound instead of speech, your Mac found no text to read. Select the text first, or click into the window that holds it.
Option-Esc does nothing
- Another app may use the same shortcut. Set a different one in the Speak selection Info panel, or use Edit › Speech › Start Speaking.
- If an app doesn't respond, copy the text into TextEdit or Notes and play it there.
A voice won't download
- You need an internet connection; downloads come from Apple.
- Wait until the download finishes; the voice can't be selected before that.
- Not every voice exists in every language. If you can't find one, select the language in the sidebar of the voice list and scroll down for other regions.
It reads in the wrong language or accent
- Check System speech language and turn on Detect languages for mixed texts.
- Choose a System voice for the language you read most.
- In Word, set the document's proofing language; Read Aloud follows it.
Your Mac talks by itself
VoiceOver is probably on: press Command-F5. Otherwise check Speak announcements, Speak item under the pointer and Speak typing feedback in Read & Speak.
Personal Voice or Live Speech is missing
Both need a Mac with Apple silicon; Personal Voice also needs a supported language and a login password.
The say command fails
Check the voice name against say -v '?', put names with spaces in quotes, and make sure the folder you save to exists.