iMovie has no subtitle feature as such: you insert subtitles by adding one title per spoken line and placing it at the bottom of the frame. On a Mac, click Titles above the browser, drag a title over your clip, type the line in the viewer and drag the title's edges to match the speech. On iPhone or iPad, tap a clip, tap Titles, pick a style and set Style to Lower Third. For automatic captions or an SRT file, use Final Cut Pro, a free burn-in tool, or a YouTube or Vimeo upload instead.
What iMovie can and can't do with subtitles
Start with what Apple documents. As of November 2026, the current versions are iMovie 10.4.5 for Mac (released September 29, 2026) and iMovie 3.0.6 for iPhone and iPad (released October 22, 2026), according to their App Store listings. Neither listing mentions captions, subtitles or subtitle files, and Apple's iMovie user guides describe only titles: text you place over or above a clip.
In practice, that means:
- No automatic captions. Apple's iMovie guides describe no speech-to-text or caption generation. You type every line.
- No SRT import. Apple doesn't document importing an SRT, VTT or other subtitle file, on Mac or on iPhone. If a guide shows you a "subtitle import" menu in iMovie, Apple's own guide doesn't have it.
- Titles are burned in. A title becomes part of the picture when you export. Viewers can't switch it off, and you can't extract it later as a file. Keep an export without titles too; our guide on removing subtitles from a video explains why burned-in text is so hard to take out.
- One language per export. A second language means a second project or export.
| You want to | iMovie on Mac | iMovie on iPhone and iPad |
|---|---|---|
| Type a subtitle line over the video | Yes, as a title | Yes, as a title on a clip |
| Place the text at the bottom | Yes, choose a style and position | Yes, Style then Lower Third |
| Set when each line starts and ends | Yes, drag the title's edges or use Duration | Through clip length: split the clip |
| Generate captions from speech | Not documented | Not documented |
| Import an SRT or VTT file | Not documented | Not documented |
| Export a separate subtitle file | Not documented | Not documented |
So iMovie suits short videos: a reel, a family clip, a demo with a handful of lines. For a long interview with hundreds of lines, skip ahead to the other routes. They save hours.
Before you start: prepare your subtitle lines
Typing while you listen means switching between playback, typing and timing for every title. Prepare the text first:
- Get a transcript. Type it while listening, or use a transcription tool; our guide on how to turn audio into an SRT file covers the options.
- Cut it into subtitle-sized lines. One idea per subtitle, one or two short lines each (the numbers are in the readability section below).
- Note roughly when each line starts. You'll fine-tune by eye in iMovie.
If you write these lines as an SRT file, you get two things at once: text you can paste into iMovie line by line, and a file you can upload to YouTube or Vimeo later. An SRT is just numbered blocks of timing and text:
1
00:00:01,200 --> 00:00:03,900
Welcome back to the workshop.

2
00:00:04,100 --> 00:00:07,600
Today we're fixing the wobbly
leg on this old chair.

3
00:00:08,000 --> 00:00:10,400
First, take off the seat.
Our guide to the SRT file format explains each part of a block and how to edit one in any text editor.
How to add subtitles in iMovie on Mac
These steps follow Apple's iMovie User Guide for Mac. Open your project so the movie is in the timeline.
Add the first subtitle
- Move the playhead to where the first line is spoken.
- Click Titles above the browser (Command-3 also shows them). If you chose a movie theme, its titles are listed first.
- Pick a simple, static style. Many titles are animated, which suits an opening title but distracts in subtitles; skim a thumbnail to see the motion. You can also search the browser by title name.
- Add the title in one of three ways Apple describes: double-click it to insert it at the playhead, drag it into the timeline above a clip, or drag it onto a clip. One detail matters here: dropped in the first or last third of a clip, the title lasts for that third; dropped in the center, it spans the whole clip.
- Select the title, double-click the placeholder text in the viewer and type your line. If the style has a second text field, press Tab to reach it, or delete its placeholder.
- Click Apply above the viewer.
Apple's article on adding text says the title is added as an attached clip above the video clip, and attached clips move with their clip. If you move a shot, its subtitles go with it.
Change the font, size, color and outline
Double-click the title in the timeline to show the title controls above the viewer:
- Font: the Font pop-up menu; Show Fonts, its last item, opens the macOS Fonts window.
- Size: the Size pop-up menu to the right of the Font menu.
- Alignment: the text alignment buttons. Centered is standard for subtitles.
- Bold, italic, outline: B, I or O. The outline keeps white text readable over bright footage.
- Color: the color well, which opens the Colors window.
Click Apply when you're done. Apple warns that some styles have locked elements, and that some theme and animated titles don't allow font changes. If a control won't respond, pick a different style.
Make each subtitle match the speech
- Drag an edge: drag either end of the title bar in the timeline to lengthen or shorten it.
- Type a duration: select the title, click the Clip Information button in the adjustments bar and enter a value in the Duration field.
- Move a title: drag the whole title bar to a new spot.
With View > Snapping on, title edges line up with clip edges and a yellow line shows the match. For subtitles that start mid-shot, snapping off can make it easier to place an edge exactly where a word begins. The Left and Right Arrow keys move the playhead one frame at a time.
Add the next lines faster
- Format the first subtitle completely before adding the second, so you know which settings to repeat. Apple's guide describes formatting one title at a time.
- Use the same style for every title, so position and look stay identical.
- Apple's shortcut list includes Copy (Command-C) and Paste (Command-V), but its title pages don't describe copying a title. If pasting a selected title doesn't behave as you expect, add each new title from the browser.
- To restyle an existing title, put the playhead on it, click Titles and double-click the new style. Apple says it keeps the duration and your text adjustments.
To remove a subtitle, select its title bar (it gets a yellow border) and press Delete, or choose Edit > Delete.
How to add subtitles in iMovie on iPhone and iPad
Apple's guides for iMovie 3.0.6 describe the same steps on iPhone and iPad. The difference from the Mac: a title belongs to a clip, so to change the text mid-shot you split the clip.
Add a title and move it to the bottom
- Open your movie project and tap a video clip in the timeline to show the inspector.
- Tap the Titles button and tap a title style.
- Tap the sample title in the viewer, tap Edit, type your line and tap Done on the keyboard.
- Tap Style, choose Lower Third, then tap Options. Apple says Lower Third places the title toward the bottom of the viewer.
- Drag the title to fine-tune its position, and pinch it to resize it. Font and Color in the inspector change the look.
- Tap Close when you're done.
Under More, turn on Text Shadow for readability over bright footage, and leave Uppercase off, since long lines in capitals are harder to read. A clip with a title shows a small T icon in its upper-left corner in the timeline.
Make the title last the whole clip
Under More, turn on Full Clip Duration, which Apple describes as making the title appear over the entire clip. You'll then shape each clip to the length of one spoken line.
One line per clip: split the clip
Apple's iPhone guide says you can split a video clip to add different titles to each section. That is the subtitle workflow on iPhone and iPad:
- Scroll the timeline so the playhead sits where the next line starts (not at the very beginning of the clip).
- Tap the clip, tap the Actions button and tap Split. Or tap the clip so it's outlined in yellow and swipe down over the playhead.
- Tap the new second clip and give it a title with the next line.
- Repeat for each line.
iMovie inserts a None transition, a plain cut, between the pieces, so the picture doesn't change. Keep it; a dissolve would blur the video mid-sentence. To change or remove a title, tap the clip, tap Titles, and choose another style or None.
Export the subtitled movie
On a Mac: select the movie, choose File > Share > File, set Format, Resolution and Quality, click Next, name the file and click Save.
On iPhone or iPad: in the Projects browser, tap your project, tap the Share button and choose Share Video. Options sets the resolution; then tap Back or Done and choose Save Video for your photo library, or Save to Files.
Readability rules for iMovie subtitles
iMovie lets you choose any font and size, so the rules are yours to set. Netflix's public style guides are a good reference because they give concrete numbers:
| Rule | Netflix guideline | What it means in iMovie |
|---|---|---|
| Line length | Up to 42 characters per line (English) | Shorten or split a line before it fills the title box |
| Lines per subtitle | Two at most | One is better; two only for longer sentences |
| Reading speed | Up to 20 characters per second for adults, 17 for children's programs | About 80 characters need four seconds or more on screen |
| Shortest subtitle | Five-sixths of a second | Never leave a title on for just a flash |
| Longest subtitle | Seven seconds | Split a long speech into several titles |
| Position | Centered, top or bottom, not over on-screen text | Use a lower third; move a title up when it would cover text |
| Line breaks | After punctuation, or before a conjunction or preposition | Keep "the chair" or "New York" on one line |
Three more points for titles you style yourself. Contrast comes first: white text with an outline (Mac) or a text shadow (iPhone and iPad) stays readable over most footage. Keep the size and position identical everywhere, because a subtitle that jumps around tires the viewer. And choose a plain sans-serif font; our guide to the best subtitle fonts compares readable options.
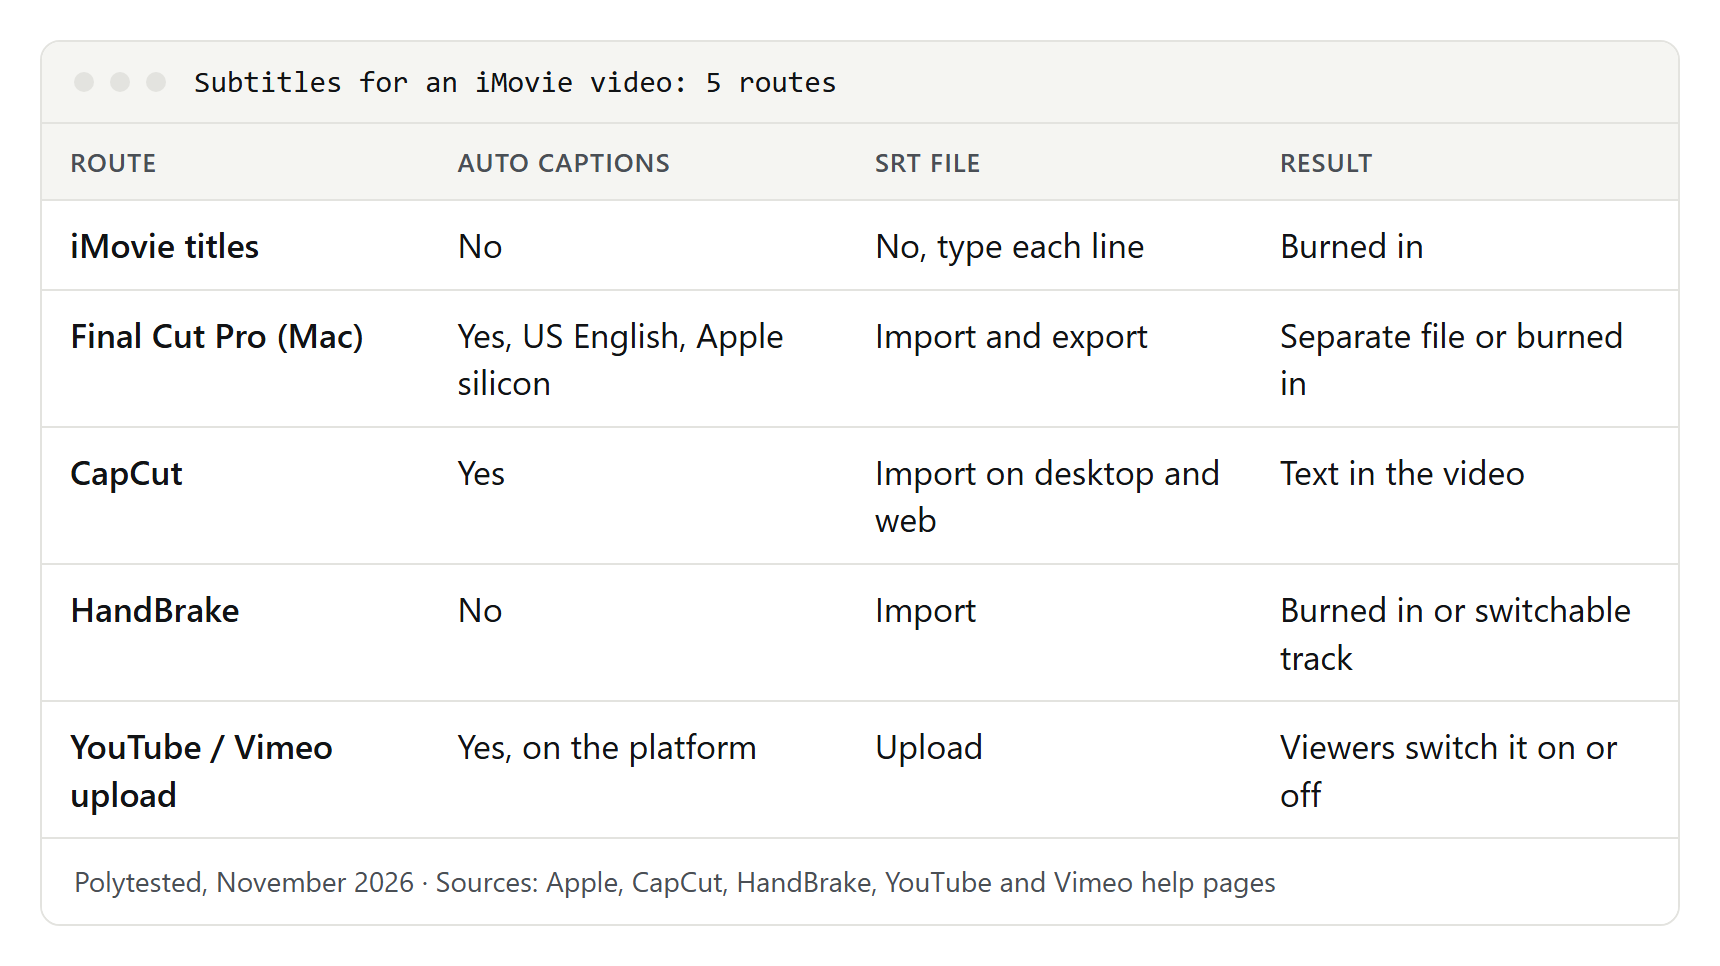
Which route fits your video
The iMovie titles method is one option among several. Here is how the routes in this guide compare, from what each vendor documents:
| Route | Automatic captions | Uses an SRT file | Result | Best for |
|---|---|---|---|---|
| iMovie titles | No | No, you type each line | Burned in | Short videos with a few lines |
| Final Cut Pro for Mac | Yes, US English, Apple silicon | Imports and exports SRT, iTT, SCC | Separate file or burned in | Long videos, several languages |
| CapCut | Yes, on desktop, web and mobile | Imports SRT on desktop and web | Text in the video | Social clips, phone editing |
| HandBrake | No | Imports an SRT file | Burned in or a switchable track | Free burn-in of an existing SRT |
| YouTube or Vimeo upload | Yes, on the platform | Uploads SRT (Vimeo also WebVTT) | Viewers switch it on and off | Videos you publish online |
A simple rule: if you publish on YouTube or Vimeo, upload the subtitle file and keep the video clean. If the video goes to social apps or messages, where viewers can't load a subtitle file, burn the text in: with iMovie titles for short clips, with another tool for long ones.
Final Cut Pro: import an SRT or generate captions
Final Cut Pro is Apple's professional editor for Mac, and its user guide (version 12.4) has a full captions section. In iMovie on Mac, open the movie project and choose File > Send Movie To Final Cut Pro. Final Cut Pro opens, creates a library named after your iMovie library and puts the project in a new event. Only movie projects can be sent, so convert a trailer to a movie first. Apple's page doesn't say whether iMovie titles carry over, so check the project when it arrives.
Final Cut Pro then offers three caption tools:
- Import a subtitle file: choose File > Import > Closed Captions and pick an SRT (.srt), iTT (.itt) or CEA-608 (.scc) file. Set a caption role and language subrole under Import as Role, and an Insertion Time (Relative to Timeline or Absolute). The captions appear in a lane at the top of the timeline.
- Generate captions from speech: select the clips and choose Edit > Generate Captions > Closed Captions (Shift-Command-C). Apple lists a Mac with Apple silicon and US English speech only; the first run downloads a language model, so you need an internet connection. The result is iTT captions. Apple suggests Voice Isolation and Noise Removal when there's music or background noise.
- Export: File > Export Closed Captions writes one file per language subrole. For SRT, Apple recommends turning off Include Formatting, since SRT has no styling standard.
SRT and iTT captions can't be embedded inside the exported video; they travel as separate files. To make the text visible on every player, many of Final Cut Pro's share destinations offer an option to burn captions in.
Clips and Live Titles: only if you already have it
Older guides recommend Apple's Clips app, whose Live Titles feature writes animated captions from your voice as you record. That advice is out of date. Apple's support article says Clips is no longer being updated and is no longer available for download for new users as of October 10, 2025. You can continue to use it on iOS 26 and iPadOS 26 or earlier, and if you downloaded it before, you can redownload it from your Apple account.
If Clips is still on your device, Apple's guide describes Live Titles this way: open a video, tap the Effects button, tap Live Titles, choose a style, tap Close, then touch and hold Record and speak. Your speaking pace sets the timing. To fix a misheard word, tap the clip, then Effects, Live Titles and Edit Text; Switch Language lets you record in another language. Save the video and bring it into iMovie for the rest of the edit. For new projects, plan on another route.
Make an SRT file and burn it in for free
With an SRT file, you don't need to type subtitles in iMovie at all. Export the movie from iMovie without titles, then add the subtitles with another tool.
CapCut: automatic captions and SRT import
CapCut's help center (articles dated January 30, 2026) describes automatic captions on desktop, web and mobile: open Captions, choose Auto Captions, select the language and click Generate, then review and edit the text. To use your own file, the desktop app imports SRT (or TXT with timecodes) under Captions > Add Captions, in UTF-8 encoding; the web version has an Upload caption file button for SRT only. CapCut says the mobile app doesn't import subtitle files.
HandBrake: burn an SRT into the video
HandBrake is a free, open-source video converter for Windows, Mac and Linux. Its documentation describes two outputs: a hard burn, where the text is written into the picture permanently, and soft subtitles, a separate track viewers switch on in a player that supports it. Soft subtitles work in MP4 and MKV, not in WebM.
Open the video, go to the Subtitles tab, press the Tracks button and choose the option to import your SRT, then set the track to be burned in if you want the text in the picture. HandBrake's documentation describes burning a single subtitle track per file. Two settings matter:
- Char Code: pick the correct character encoding. HandBrake warns that a wrong choice can leave the output with no subtitle track.
- Offset: a value in milliseconds that shifts every subtitle earlier or later. Our guide on how to sync subtitles covers fixing timing in the SRT itself.
Descript: from transcript to subtitle file
Descript is a transcript-based editor. Its help center describes exporting subtitles as .srt or .vtt with three settings that match the readability rules: Show speakers, Max characters per line and Max lines per card. You can burn that file in with HandBrake, import it into Final Cut Pro or upload it online.
Upload the SRT to YouTube or Vimeo instead
For a video that goes online, the cleanest option is to keep subtitles out of the picture and upload them as a file. Viewers can then switch them on or off.
YouTube, from YouTube's help page: in YouTube Studio, choose Subtitles from the left menu and select the video. Click ADD LANGUAGE and choose the language, then under Subtitles click ADD and Upload file. Choose With timing for an SRT file (or Without timing for a plain transcript), select Continue, pick the file and click Save. Our guide to YouTube subtitles covers how viewers turn them on and change their style.
Vimeo, from Vimeo's help center: open the video from your Library, click Languages next to the player, click + and upload the file. Set the Language and the Type (Subtitle or Caption), click Upload and toggle the file on. Vimeo accepts SRT and WebVTT, recommends WebVTT and requires UTF-8 encoding. It also lists automated subtitle transcription on Free and paid accounts.
Troubleshooting iMovie subtitles
The subtitle disappears too early. On a Mac, drag the title bar's right edge or set a longer Duration under Clip Information. On iPhone and iPad, turn on Full Clip Duration under More and check that the clip itself is as long as the line.
The title covers only part of the clip (Mac). A title dropped on the first or last third of a clip lasts for that third. Drop it in the center to span the clip, or drag its edges.
The text is cut off. The line is too long for the style's text box. Shorten it, choose a smaller size, or split the sentence into two subtitles; on iPhone and iPad, pinch the title smaller.
The font or size menu does nothing. Some styles have locked elements, and some theme and animated titles don't allow font changes. Switch to a simpler style; Apple says the new style keeps the duration and text.
The subtitles moved after editing. On a Mac, titles are attached to the clip below them. After trimming or moving clips, play the whole movie again and fix any title that drifted from its line.
My SRT file won't open in iMovie. That's expected: Apple documents no subtitle file import in iMovie. Use the file with Final Cut Pro, CapCut, HandBrake, YouTube or Vimeo, or copy its lines into titles one by one.