DaVinci Resolve has auto captions, but only in DaVinci Resolve Studio: Blackmagic Design lists Create Subtitles from Audio as a Studio feature. In the free version you can still add a subtitle track, type captions by hand, import an SRT file, style the track and export SRT, WebVTT or TTML, or burn the text into the video. This guide follows Blackmagic's own documentation up to DaVinci Resolve 21.2 (November 2026): every route, step by step, plus a sample SRT and fixes for the usual problems.
The short answer by situation
| Your situation | What to do in Resolve | Edition |
|---|---|---|
| You have Studio and want captions fast | Create Subtitles from Audio, then correct the text | Studio |
| You already have an SRT file | Import it and drag it onto a subtitle track | Free and Studio |
| Short video, a few lines | Add a subtitle track and type each caption | Free and Studio |
| You want the text inside the picture | Export with the subtitles burned into the video | Free and Studio |
| You upload to YouTube, Vimeo or a course platform | Export the subtitles as a separate SRT or WebVTT file | Free and Studio |
| You want animated, word-by-word captions | Studio's Animated subtitle templates, or a Fusion title template on the track | Studio for Animated |
| You use the free version and have no SRT | Make the SRT in another tool, then import it | Free |
The rest of this page goes through each row. Menu names follow DaVinci Resolve 21 on the Edit page; the Cut page has the same subtitle tools, as Blackmagic notes in its 18.5 guide.
Free version vs Studio: what Blackmagic lists
The confusion around Resolve captions comes from one split. Subtitle tracks themselves are part of every DaVinci Resolve: Blackmagic's Edit page describes importing timed text, creating captions from scratch, one track per language, styling in the Inspector, and either rendering the subtitles into the video or exporting them as separate TTML, SRT or VTT files. Nothing there is marked as Studio only.
The features that listen to the audio are different. Each New Features Guide marks them as Studio only: Auto Caption in 18.5 (now called Create Subtitles from Audio), text-based editing in the Transcription window in 19, the extended transcription languages and AI Animated Subtitles in 20.
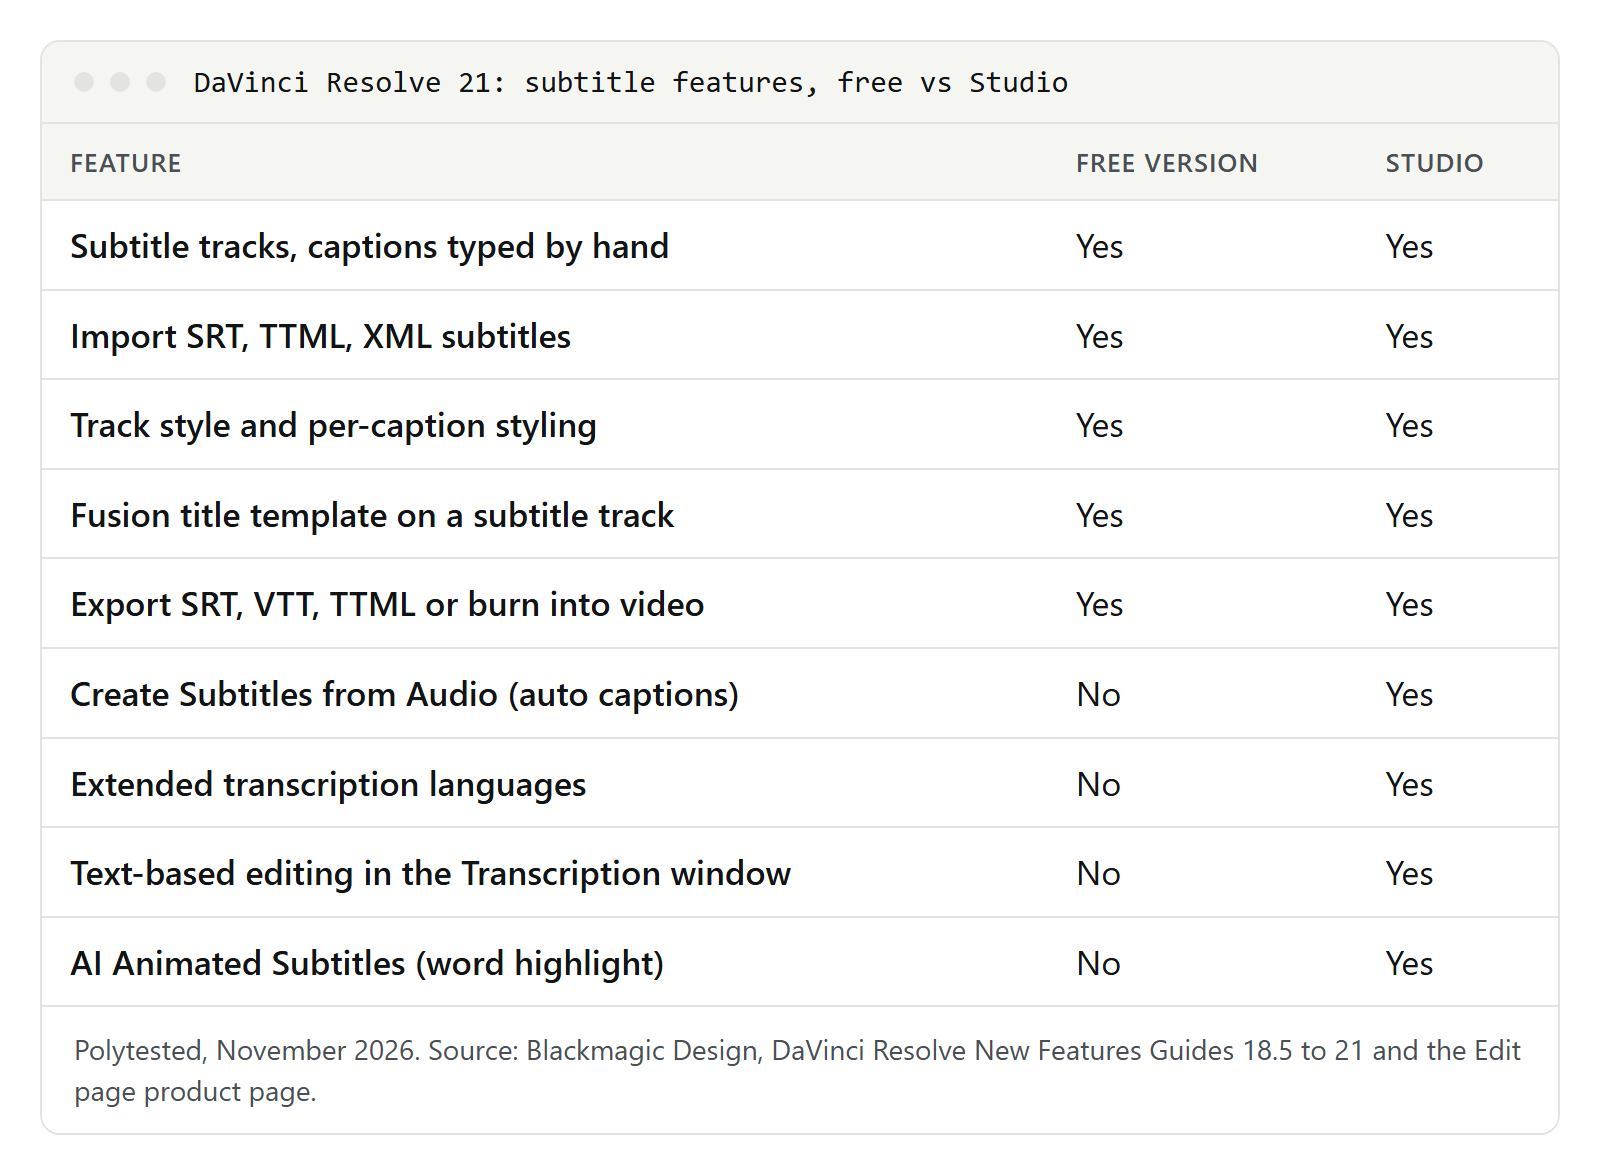
| Feature | Free version | Studio | Where Blackmagic documents it |
|---|---|---|---|
| Subtitle tracks, captions typed by hand | Yes | Yes | Edit page product page |
| Import TTML, SRT, XML and embedded MXF/IMF subtitles | Yes | Yes | Edit page product page |
| Track styles: font, color, size, position | Yes | Yes | Edit page product page |
| Fusion title template on a subtitle track | Yes | Yes | New Features Guide 20 |
| Render into the video or export TTML, SRT, VTT | Yes | Yes | Edit page product page |
| Find and replace, fade handles, Font Browser | Yes | Yes | New Features Guide 21 |
| Create Subtitles from Audio | No | Yes | New Features Guide 18.5 |
| Text-based editing in the Transcription window | No | Yes | New Features Guide 19 |
| Extended transcription languages | No | Yes | New Features Guide 20 |
| AI Animated Subtitles | No | Yes | New Features Guide 20 |
One caveat on the 21 row: the DaVinci Resolve 21 guide doesn't mark any feature by edition, so "Yes" there means "not listed as Studio only". Word timing analysis, also new in 21, works on transcriptions, and transcription is a Studio feature in the earlier guides.
How to make auto captions in DaVinci Resolve Studio
Auto captions turn the speech on your timeline into subtitle clips. Blackmagic's description goes beyond plain speech to text: the tool adds punctuation, capitalizes names, can recognize quotes and questions, and inserts a tag when music plays in the background.
- Open the timeline you want to caption on the Edit page. Finish the edit first, or at least lock the dialogue, because later cuts move the speech away from the captions.
- Set an In and Out range if you only want part of the timeline captioned. With no range, Resolve captions the whole timeline.
- Choose Timeline > AI Tools > Create Subtitles from Audio. Older versions put the command straight into the Timeline menu; on the Cut page it sits in the Timeline Actions menu.
- In the dialog, choose the Language of the speech, a Caption Preset and the Max Characters per Line. Larger numbers make longer lines, smaller numbers shorter ones.
- Click the button to start. A progress window appears while Resolve transcribes.
When it finishes, the captions land on a subtitle track. If the timeline has none, Resolve creates one; if it has several, Resolve writes to the highest subtitle track. So add an empty track at the top before you run it, or the new captions may land on top of an existing language.
Get better captions on the first pass
Blackmagic names one weak spot itself: overlapping dialogue spread over several audio tracks. Mute the tracks you don't want transcribed, such as music or a second camera's microphone, before you start. Two more habits help:
- Decide on line length first. Changing Max Characters per Line later means running the tool again or splitting captions by hand.
- Read every caption once with the sound on, and check names, numbers and technical terms with extra care.
Which languages Resolve can transcribe
DaVinci Resolve 20 improved transcription and added many languages through a separate download, because the language models are large. In Studio:
- Open DaVinci Resolve > Extras Download Manager.
- Download the Extended Transcription Language Support package.
- In Project Settings, open Subtitles and Transcription and check Enable Extended Language Support.
With the package, Blackmagic's 20 guide lists 57 languages, including English, Spanish, French, German, Portuguese, Italian, Dutch, Polish, Turkish, Arabic, Hindi, Chinese, Japanese and Korean. Blackmagic adds that some of them are still in beta, so plan extra proofreading time for less common languages.
How to add subtitles by hand
Typing captions yourself works in both editions and is often quicker than it sounds for a short clip, a social cut or a few lines of translation.
- Add a subtitle track. On the Edit page, right-click a track header and choose Add Subtitle Track; on the Cut page, use Add Subtitle Track in the Timeline Actions menu.
- Open the Effects Library, go to Titles and find Subtitle. Drag it onto the subtitle track where the first line is spoken.
- Select the subtitle clip. In the Inspector, type the text in the Caption tab.
- Trim the clip's edges in the timeline so it starts when the speaker starts and ends shortly after they stop. Subtitle clips move and trim like any other clip.
- For the next line, add a new caption from the Caption tab or drag another Subtitle onto the track, then repeat.
To work faster, play the section once and set a marker where each sentence begins, then place the captions on the markers.
Several languages in one timeline
Blackmagic's Edit page describes subtitle tracks for different languages that you can switch between. Keep one track per language, named after it, all timed to the same cuts: duplicate the finished track, rename it, and replace the text caption by caption; the timing stays.
How to import an SRT file
If someone else made the subtitles, or you created them in another tool, import the file instead of retyping it. Blackmagic lists timed text in TTML, SRT and XML, plus subtitles embedded in MXF and IMF files.
- Choose File > Import > Subtitle and select the file. It appears in the Media Pool as a subtitle item.
- Drag it from the Media Pool onto the timeline. Resolve places it on a subtitle track, creating one if needed.
- Play the beginning, middle and end. If all three are off by the same amount, move the whole subtitle item. If the gap grows, the file was made for a different version or frame rate; see the troubleshooting section.
An SRT carries only text and times. Fonts, colors and positions from another program don't come along, so you style the track in Resolve after import. Our SRT guide explains why, and how a WebVTT file differs.
Importing a transcript for a clip
There is a second import, for transcription rather than finished subtitles. Since version 19 you can right-click a clip in the Media Pool and choose Audio Transcription > Import from Subtitles to load an SRT as that clip's transcript. Blackmagic warns that the clip's timecode must match the timecode in the SRT for accurate results. In version 21 the command AI Tools > Audio Transcription > Import and Detect Timing goes further and lets Resolve analyze the timing of an imported transcript.
How to style subtitles: track style and single captions
Select a subtitle clip and look at the Inspector. Resolve separates two levels:
- Track: settings in the Track tab apply to every caption on that track: font, color, size and position, plus stroke options. Version 18.6 added a font case option and an Outside Only stroke here. This is where you set the look once.
- Caption: the Caption tab holds the text of the selected caption. A caption can also carry its own styling when one line needs to look different, for example a speaker off screen or a sign translated in italics.
Set the track style first and change single captions only where you have a reason; that keeps the whole video consistent.
Version 21 adds two helpers. A Font Browser shows your installed fonts in a larger preview when you pick a font for text and subtitle elements. And the subtitle Inspector now has find and replace for the whole track: click the search icon in its upper right, search for a word, then use Replace or Replace All. That's the quickest way to fix a name the transcription spelled wrong throughout the video. Subtitle clips in 21 also have fade-in and fade-out handles, like video and audio clips.
Which font, size and background work best on a phone screen is a topic of its own; our subtitle font guide compares readable fonts and explains line length and reading speed.
How to turn subtitles into styled or animated text
Many people searching how to add their subtitles to text in DaVinci Resolve want the captions to look like titles: bold social-media captions, a highlighted word, a bounce. Blackmagic's documented route keeps the subtitle track and puts a Fusion template on top of it, so you don't have to rebuild every line as a separate text clip.
Fusion title template on the track. Since version 20, you can drag any Fusion title template from the Effects Library onto the subtitle track header. According to Blackmagic, the Fusion template then overrides any track or per-caption styling from the Inspector, so the text keeps its timing but takes the template's look. You can build your own template in Fusion for full control over fonts and layout.
AI Animated Subtitles (Studio). Version 20 also added a set of Fusion title templates called Animated, in the Titles section of the Effects Library. Drag one onto the subtitle track header, then adjust its parameters in the Inspector. Blackmagic's example, Word Highlight, colors each word as it is spoken, because these templates use the transcription engine to match the words to the audio.
Word timing for captions you typed or imported. Before version 21, word-by-word highlighting needed subtitles generated in Resolve. Now Resolve can analyze word timing for any caption:
- Select a subtitle clip, open the Caption tab in the Inspector and click Update Word Timings.
- To retime a whole track, right-click the subtitle track header and choose Synchronize Word Timings.
Use this after you correct auto captions too: Blackmagic notes that edits to generated subtitles can be reanalyzed so animated captions stay in step with the voice.
Transcription and text-based editing
Subtitles and transcripts share one engine in Resolve. In Studio, right-click clips in the Media Pool and choose AI Tools > Audio Transcription > Transcribe. Version 21 adds a Transcription column to the Media Pool list view that shows the first words of each transcribed clip, while searches match the whole transcript.
The Transcription window does more than display text:
- Text-based editing (Studio, since 19): select a sentence in the transcript, and Resolve sets In and Out points on the timeline. Cut, copy, paste and delete text, and the timeline follows. Silences show as (...) and can be deleted.
- Speaker detection (19): Resolve can label speakers as Speaker 1, Speaker 2 and so on, which you can rename.
- Export Subtitles: from the Transcription window's Option menu, choose Export Subtitles. The dialog asks for Caption Preset, Maximum Characters per Line, Number of Lines and Gap Between Subtitles, then Create writes an SRT file.
- Transcript exports (Studio, since 20): a transcript exported as text includes speaker names and timecode for each block.
This gives you an SRT for a clip without building a subtitle track first, for example for a translator.
How to export subtitles from DaVinci Resolve
Blackmagic's Edit page sums up the two outcomes: subtitles can be rendered into the final video, or exported as separate TTML, SRT or VTT files. Which you pick depends on where the video goes.
| Goal | Choose | Viewers can turn them off |
|---|---|---|
| Captions always visible, for social video | Burn into Video on the Deliver page | No |
| A subtitle file next to your video file | As a Separate File on the Deliver page, SRT or WebVTT | Yes |
| Only the subtitle file, no render | File > Export > Subtitle on the Edit page | Yes |
| A file for broadcast or a distributor | Separate TTML, or captions embedded in a format that supports them | Yes |
Export the subtitles together with the video
- Go to the Deliver page and choose your render settings as usual.
- On the Video tab, open Subtitle Settings and check Export Subtitle.
- Choose the format: Burn into Video to print the text into the picture, or As a Separate File to write SRT or WebVTT next to the video. Some delivery formats also offer embedded captions.
- Pick which subtitle tracks to include. With several languages, choose the one to burn in, or export each language as its own file.
- Add the job to the Render Queue and render.
Burned-in text can't be switched off, translated later or read by platforms as text. A separate file keeps those options open, and platforms like YouTube accept it directly. If you're unsure which one you need, our guide to the VTT file explains when WebVTT is the better choice over SRT for the web.
Export only the subtitle file
When you just need the file, you don't have to render. On the Edit page, choose File > Export > Subtitle, pick the subtitle track, choose SRT or WebVTT and save. Remember that this file holds text and times only: your track style stays in Resolve.
If you render with scripts, version 20.2 added scripting API support for adding subtitles in render jobs.
No Studio? Make the SRT elsewhere and bring it in
If you use the free version and don't want to type everything, the practical route is to create the subtitles in another tool and import the SRT. Our guide to turning audio into an SRT file compares free ways to do that.
Descript is one option on the editing side. Its help center lists subtitle export as .srt or .vtt, with Show speakers, Max characters per line and Max lines per card. Descript's timeline export also offers a DaVinci Resolve (XML) format, and its feature chart says captions are included. Either way, check the timing in Resolve after import, especially if the edit changed after the subtitles were made.
Set the line length in that tool, because Resolve imports the lines as they are.
A sample SRT file you can use as a template
If you write subtitles in a text editor, this is the shape Resolve imports. Each block has a number, a time range with milliseconds after a comma, one or two lines of text, and an empty line. Save it as UTF-8.
1
00:00:01,000 --> 00:00:03,400
Welcome back to the studio.

2
00:00:03,600 --> 00:00:06,800
Today we're adding subtitles
in DaVinci Resolve.

3
00:00:07,200 --> 00:00:09,900
First, check where your timeline starts.

4
00:00:10,300 --> 00:00:13,000
[soft music]
SRT times count from zero. If your timeline's start timecode isn't zero, check the first line after import and move the whole item if it doesn't match the speech. Our SRT guide covers the format rules in full, including encoding for accented letters.
Troubleshooting DaVinci Resolve subtitles
Create Subtitles from Audio is missing or grayed out. It's a Studio feature in Blackmagic's documentation. Check under DaVinci Resolve > About DaVinci Resolve whether you run Studio. In Studio, check that the timeline has audio that isn't muted, and that you opened the menu with the timeline active.
Your language isn't in the list. Install the Extended Transcription Language Support package in the Extras Download Manager, then check Enable Extended Language Support in Project Settings under Subtitles and Transcription.
Captions mix up two speakers. Overlapping dialogue across tracks is the case Blackmagic names as the most common failure. Mute the tracks you don't need and run it again, or fix those lines by hand.
Subtitles don't appear in the exported video. Check that Export Subtitle is on in the Deliver page's Subtitle Settings, that the right track is selected, and that the subtitle track isn't disabled in the timeline. If you chose a separate file, the text won't be in the picture: look for the SRT or VTT file next to the video.
The exported file is missing, or the player doesn't show it. A separate file needs to be loaded by the player or uploaded to the platform. Many players find it automatically only when it has the same name as the video.
Imported subtitles are early or late by the same amount everywhere. The file and the timeline start at different points, often because of a slate, a logo or a different start timecode. Move the whole subtitle item until the first line fits.
The gap grows as the video plays. The subtitles were timed for a different version or frame rate. Moving the item won't fix that; the file needs to be stretched between two sync points. Our guide to syncing subtitles shows how to tell the cases apart and fix the file.
Imported transcript has wrong timing. For Import from Subtitles on a Media Pool clip, Blackmagic says the clip's timecode must match the SRT's. In 21, try Import and Detect Timing instead.
Styling is gone after export or re-import. SRT and WebVTT files carry text and times, not Resolve's track style. Keep the styled version in your project, or burn the subtitles in when the look matters.
Wrong font, missing letters or odd spacing. Choose a font that has every character your language needs, and install the same fonts on every computer that renders the project. Version 20.3.2 improved subtitle kerning, so updating can help with uneven letter spacing.
Word highlighting is out of step after edits. Click Update Word Timings in the Caption tab, or use Synchronize Word Timings on the track header (version 21).
What changed, version by version
If a tutorial shows menus you can't find, it was probably written for an older release. These are the subtitle-related changes in Blackmagic's New Features Guides:
| Version | Date of guide or release | What Blackmagic added |
|---|---|---|
| 18.5 | April 2023 guide, release July 2023 | Auto Caption (Studio), subtitles on the Cut page, Add Subtitle Track in Timeline Actions |
| 18.6 | September 2023 | Font case and Outside Only stroke in the subtitle Track tab |
| 19 | April 2024 guide, release August 2024 | Text-based editing (Studio), speaker detection, transcripts imported and exported as SRT |
| 20 | April 2025 guide, release May 2025 | Animated subtitles (Studio), Fusion templates on subtitle tracks, extended transcription languages (Studio) |
| 20.2 | September 2025 | Scripting API support for subtitles in render jobs |
| 20.3.2 | February 2026 | Improved kerning for subtitles |
| 21 | April 2026 guide, final release June 2026 | Find and replace, fade handles, word timing for imported captions, Font Browser |
| 21.1 | September 2026 | Subtitle support in Blackmagic Cloud Presentations |
DaVinci Resolve 21.2 was the current update when we wrote this. For a comparison with how Apple's editor handles the same job, see our guide to subtitles in iMovie.